Learning ACI - Part 8: VMM Integration
27 Feb 2015Welcome to part 8 - let’s quickly recap what we have covered so far in this series:
-
Part 1 introduced this series and discussed what topics would be covered, as well as a very brief overview of ACI.
-
In part 2, I took a look at the fabric bring up process
-
Next, we took a tour through the APIC GUI to get us familiar with the interface.
-
Part 4 looked at some of the most important ACI constructs - app profiles, EPGs, contracts and filters.
-
We had a look at networking concepts in ACI in part 5.
-
In part 6, we discussed access policies and how they are used to provision ports.
-
Last time out in part 7, I walked through setting up basic connectivity between two bare metal hosts.
OK, so what’s next? In this part, we’ll discuss VMM Integration. What does this mean exactly? Firstly, VMM stands for Virtual Machine Manager - in other words, we are talking about integration with a VM management system such as VMware vCenter, Microsoft SCVMM and so on. At the time of writing this post, ACI supports integration with vCenter (others will be supported later), so this is what we’ll concentrate on here. I should also point out that we could also use the Cisco Application Virtual Switch (AVS) to achieve this integration, but I’m going to focus on using the regular VMware distributed virtual switch in this post.
But what exactly do we gain by integrating ACI with a VM management system? Why would we actually want to do this? Consider a simple example in a ‘traditional’ environment: let’s say a server virtualisation administrator is provisioning a set of virtual machines to be used for a certain application. These VMs will be used across a number of application tiers (let’s say web, app and DB just for simplicity). We can assume that there will be a port group at the virtual switch layer corresponding to each application tier and that each one will presumably map back to a VLAN on the physical network. But which VLAN should be used for each port group? The virtualisation administrator will need to work together with the network administrator to agree on which VLAN should be used for each application tier / port group. Is this really something a virtualisation admin wants to be worrying about? For that matter, does the network admin want to be worried about which VLAN is used for any given application tier? The answer in most cases is “no”, which is precisely where ACI VMM integration comes in.
So how does this work? Fundamentally, configuring VMM integration from ACI results in a connection being made between the APIC and the vCenter server, at which time an “APIC controlled” distributed virtual switch is automatically created at the vSphere level. There is nothing particularly special about this DVS - the only difference from a ‘normal’ DVS is that this one is automatically created by the APIC and controlled by ACI. To understand what this allows us to do, take a look at the following drawing:
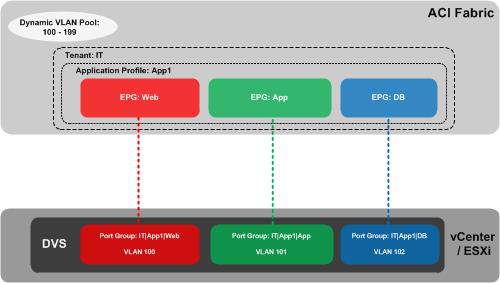
In this example, we have created a tenant on the ACI fabric called IT. Within the IT tenant, we have an application profile named App1. Within this app profile, we are creating three End Point Groups (EPGs) corresponding to our three-tiered application (Web, App, DB). Now this is where it gets interesting - as we created our EPGs, the APIC automatically created a corresponding port group on the DVS. Note the naming of the port group as tenant|app-profile|EPG-name, for example IT|App1|Web. You might also notice that each of our port groups has been allocated a VLAN (e.g. Web = VLAN 100, App = VLAN 101, etc). These VLANs have been automatically allocated to our port groups by the APIC - they have been taken from a dynamic VLAN pool which we have pre-configured on the APIC.
What does the virtualisation administrator have to do here? He or she simply adds the VMs to the correct port groups - no need to worry about provisioning these port groups, or which VLAN should be associated with each one - it all happens automatically.
Now that we understand what VMM integration provides, how do we configure it? For this to work, there are two things that must happen: firstly, the APIC obviously needs to communicate with the vCenter; secondly, the APIC must learn the location of the ESXi host (i.e. which switch / port it is connected to) using either CDP or LLDP.
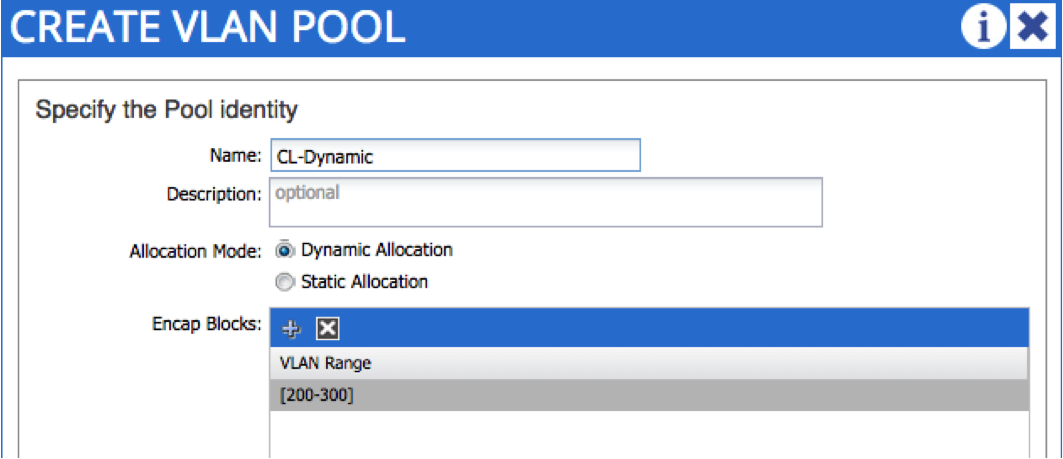
Let’s start by setting up the VMM domain. The first thing we do is create a dynamic VLAN pool. You may remember in part 6, we set up a static VLAN pool for bare metal host connectivity. In that case, VLANs were allocated manually by the administrator - in this case, we want VLANs to be allocated automatically upon EPG creation, hence the dynamic nature of the pool. In the following example, I am creating a dynamic VLAN pool named “CL-Dynamic”, with VLANs in the range 200 - 300:
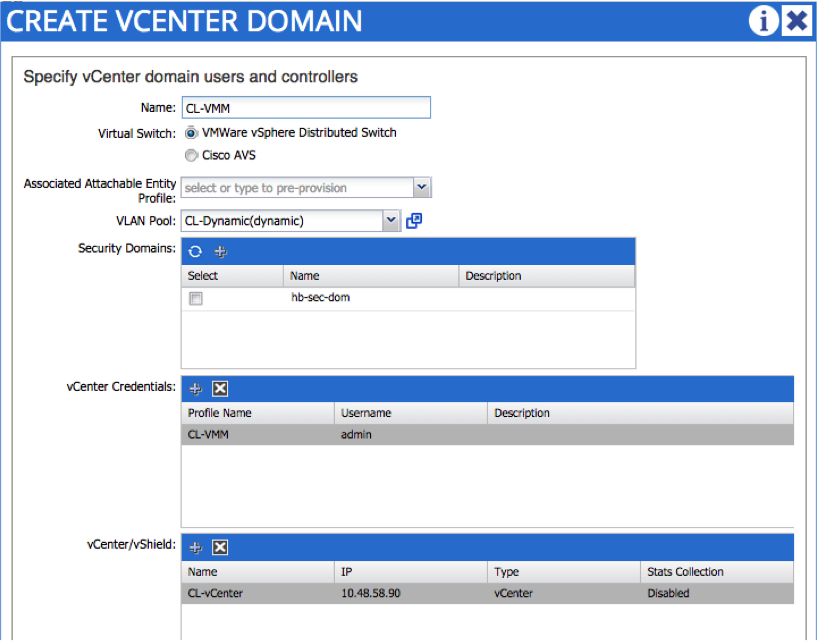
The next step is to create the VMM domain itself. To do this, you need the credentials and IP address / hostname of the vCenter - notice that you also reference the dynamic VLAN pool created in the last step:
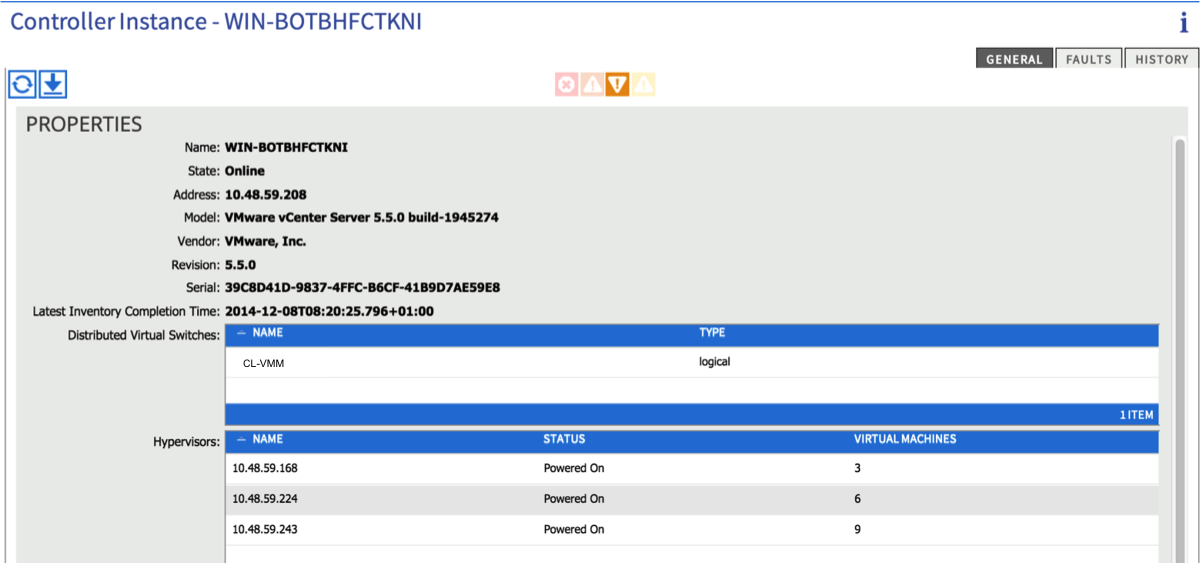
If all is well, you should now see an active connection to the vCenter (from the ‘Inventory’ tab under VM Networking). You should see details about the vCenter version as well as some info about the ESXi hosts:
One piece of manual configuration you will need to perform here is to add the physical NICs on the ESXi host (vmnics) to the new DVS that was just created.
At this point, you need to create an attachable entity profile and interface policy - the AEP should reference the VMM domain we just created. When creating the interface policy, be sure to enable CDP or LLDP as this is needed to discover the location of the ESXi host. Finally, associate the interface policy to the relevant switches and ports. Refer back to part 6 for more guidance on this process.
If you have configured everything correctly, checking the relevant vmnic under the ESXi hosts in the VM Networking Inventory tab in the APIC should display the leaf port to which the host is connected:
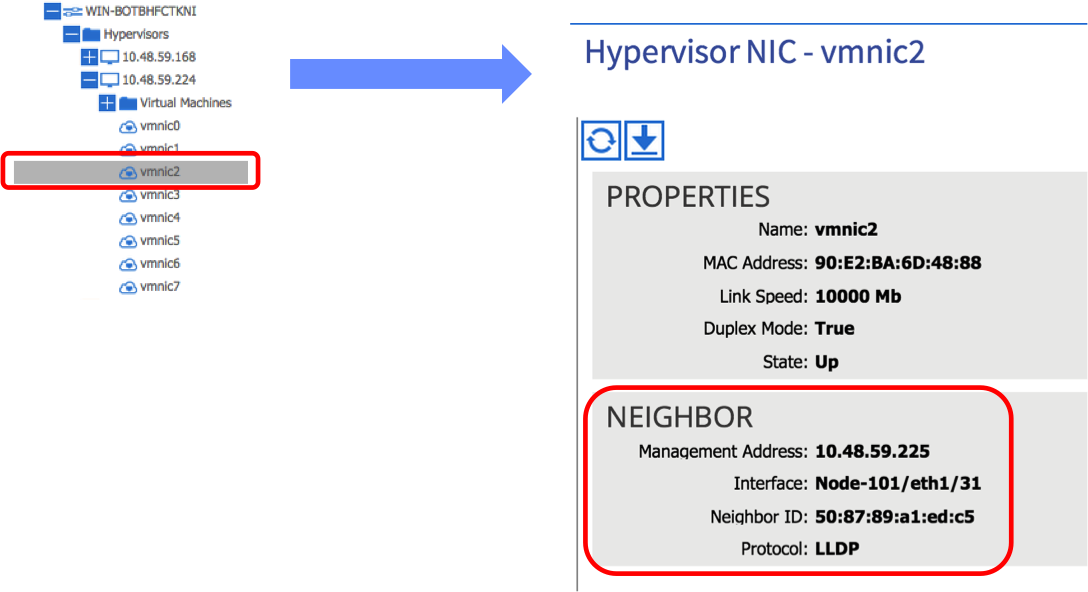
In the above example, we can see that vmnic2 on this particular ESXi host is learning that it is connected to leaf node 101 on port 1/31 via LLDP. Note that this step is important - if you don’t see the LLDP / CDP information under the correct vmnic, the APIC will not know which ports to apply policy to and connectivity will ultimately fail.
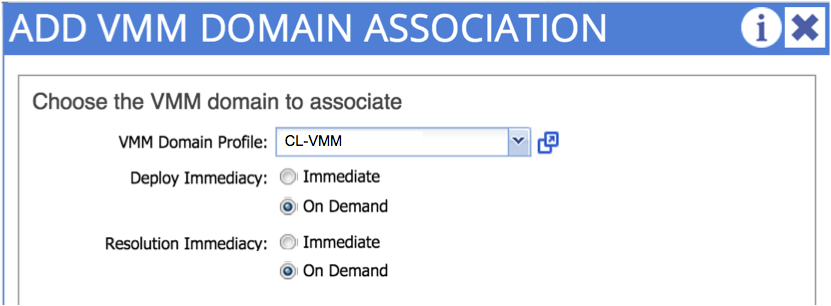
The final step is to actually to create the EPG - recall in part 7, we associated our EPG with a physical domain - we follow a similar process here, but this time we are associating our EPG with the _virtual domain _we just created:
Once we have done this, we should see the port group that corresponds to our EPG appear on the DVS:
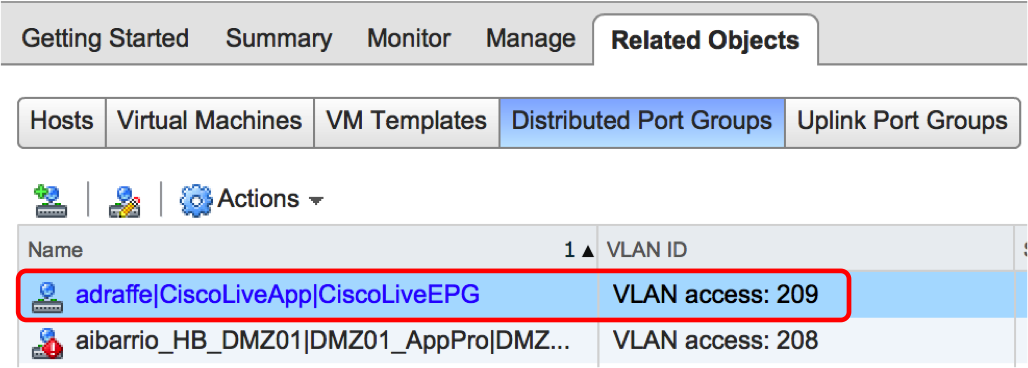
Here, you can see that I have an EPG named ‘CiscoLiveEPG’ as part of an application profile called ‘CiscoLiveApp’, all contained under a tenant named ‘adraffe’. The APIC has created a port group with the corresponding name and has used a VLAN from the dynamic pool that we created originally.
All that remains now is for the virtualisation administrator to attach the VM to this port group and you are done!
Hopefully this has given you a good overview on VMM integration - this is a cool feature which can really reduce the burden on both network and server admins. Thanks for reading.