Learning ACI - Part 2: Bringing Up A Fabric
03 Dec 2014Welcome to the second part of my blog series on ACI. Before we start to delve into policies, contracts, filters and all the other goodness to be found in ACI, we need to actually provision a fabric and bring it online. As it turns out, this is a really easy process and one which should take only a short amount of time. Obviously before we begin, we need to make sure everything is cabled correctly (leaf nodes to spine nodes, APIC controllers to leaf nodes, APIC out of band connectivity, etc).
Before we start, there are a few parameters which are useful to think about in advance and have to hand during the setup process:
-
The name you want to give your fabric.
-
Controller Name - the names you want to give to your APIC controllers (normally there will be three of these).
-
TEP IP address pool - this range will be used by the fabric to automatically allocate TEP (Tunnel End Point) addresses. Every node (leaf and spine) will be allocated at least one TEP address. It’s generally a good practice to dedicate a unique range for this.
-
Multicast address pool - this pool of addresses will be used for multicast traffic through the fabric.
-
VLAN ID for the infrastructure network - this is the VLAN ID used for internal communication in the fabric, but also may be extended outside the fabric for communication to AVS virtual switches. Therefore, it’s best to allocate an unused VLAN (be aware that this VLAN overlaps with the ‘reserved’ range on some other Nexus platforms).
-
Management IP address and gateway - this will be the out-of-band address you will use to browse to the APIC itself.
-
Admin password.
You will generally use the CIMC utility (this is essentially a UCS C series server) to access a KVM session so you can set up the APIC - once you have started the setup process, you’ll see a simple script which will ask you for the parameters above:
 Cluster configuration ...
  Enter the fabric name [ACI Fabric1 #1]:
  Enter the number of controllers in the fabric (1-16) [3]:
  Enter the controller ID (1-3) [2]:
  Enter the controller name [apic2]:
  Enter address pool for TEP addresses [10.0.0.0/16]:
  Enter the VLAN ID for infra network (1-4094)[4093]:
  Enter address pool for BD multicast addresses (GIPO) [225.0.0.0/15]:

Out-of-band management configuration ...
  Enter the IP address for out-of-band management: 192.168.10.2/24
  Enter the IP address of the default gateway [None]: 192.168.10.254
  Enter the interface speed/duplex mode [auto]:

Administrator user configuration...
  Enable strong passwords? [Y]
  Enter the password for admin:
Once you have completed the script, the APIC initialises and after a short period of time, you should be able to browse to it using the out-of-band address you configured earlier. Now that you have a single APIC up and running, what’s next? We can now start to discover the physical switching nodes in our fabric.
In the APIC GUI, click on the Fabric tab and then the Inventory sub-menu. On the left hand side, click on Fabric Membership. If all is well, you should see a single leaf node listed in here - this is the physical switch that your APIC is connected to. Notice that there is no node ID or node name listed, and the IP address is set to 0.0.0.0. What this all means is that this switch is not yet registered - in order to register the node and add it to the network, you simply need to assign a node ID and node name by double clicking on those fields. Once done, you should - after a minute or so - see an IP address appear for that node. Notice that this address is taken from the TEP range you specified during the setup process. This means that the node is now ‘registered’.
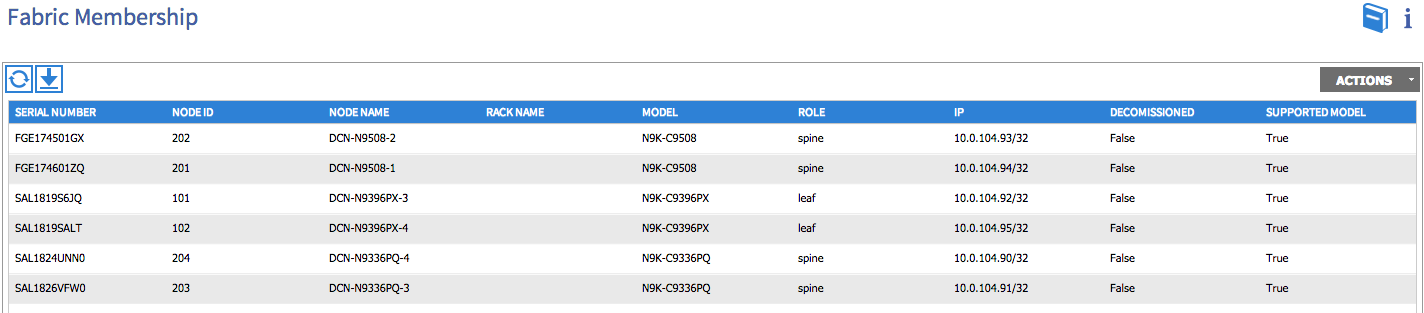
OK, so we now have a single leaf node registered - how do we discover the rest of our network? Well, once you have registered the first node, you should magically start to see additional switches (spine nodes) pop up on the Fabric Membership page. Go ahead and register these in the same way, which in turn will lead to the remaining switches appearing and available for registration. What you should eventually end up with is something that looks like this:
Now at this point, we have our full switching topology discovered….but we still only have one APIC. As your other APICs are very likely to be connected to different leaf switches, we needed to wait until those switches were discovered before we could initialise the remaining APICs and form the cluster. So you can now run the setup script on the other APICs, using the same basic info as before, but making sure you use different controller IDs, management IP address, etc.
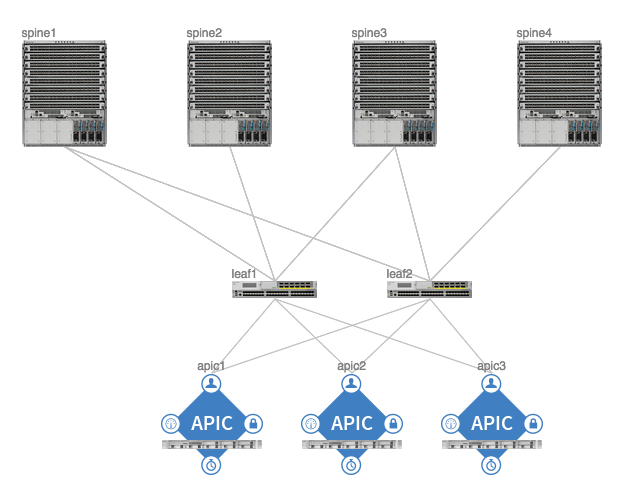
Now that your remaining APICs are up and running, your fabric is pretty much ready to go - if you go back to the Fabric Inventory **section in the APIC GUI and click on **Topology, you should see a graphical representation of your fabric:
Before you go any further, you may wish to configure your switching nodes with management IP addresses so you can SSH to them directly - do this by clicking on the Tenants tab and then the ‘Mgmt’ tenant. On the left hand side you’ll find Node Management Addresses, which will allow you to configure management IPs for every node in the fabric. Also under the Mgmt tenant, you’ll find Out-Of-Band Contracts listed under the Security Policies menu. You’ll need to configure at least one contract here to allow traffic into your OOB management interfaces. Finally, under Node Management EPGs, you can add the OOB contract to your OOB EPG.
What is really happening during discovery?
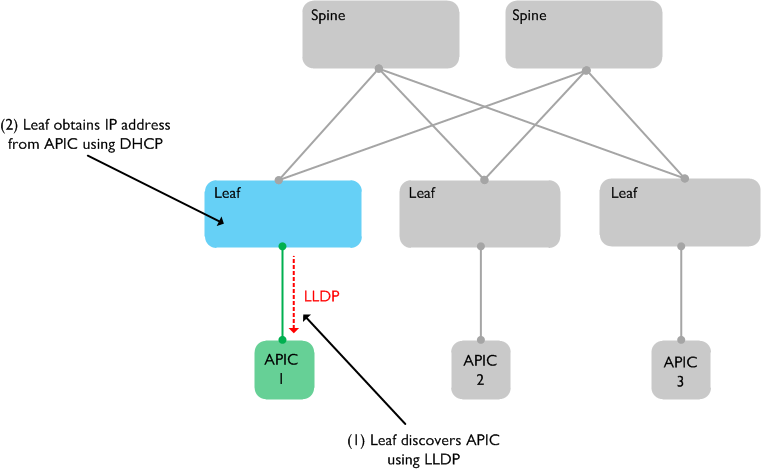
Now that we’ve looked at how to discover our fabric, it would be nice to understand exactly how this process is happening under the covers. It’s actually pretty simple - we use LLDP to determine what is connected to each port. The process is as follows:
1) When the first leaf initialises, it sends LLDP messages on its active ports to determine which port the APIC is connected to.
2) The leaf receives an LLDP message back from the APIC indicating the node type.
3) The leaf node sends a DHCP Discover message to the APIC - the APIC responds with an IP address from a locally configured pool (the pool you configured during the APIC setup script).
4) The leaf node uses this IP address as the Tunnel End Point (TEP) address.
5) Once the first leaf node has been discovered and registered by the APIC, a similar process is followed for the remaining devices in the fabric.
Thanks for reading - the next step is to have a look at the APIC and get familiar with it. Check out part 3 for this!